If you want to play songs on the guitar then you’re going to need to know some guitar chords! In this guide, we’re going to embark on a guitar chord journey with Ayla Tesler-Mabe where you’ll learn all the essential chords so you can play your favorite songs and write your own music.
This guide is broken down into three parts. These sections will cover the first eight guitar chords you should know, five beautiful guitar chords even a beginner can play, and ten tips for changing chords more smoothly. Let’s get started.
Before diving into the first video, be sure to download the PDF chord chart linked above so you can reference it at any time. The eight guitar chords in this lesson make up the majority of songs you’ll learn to play as a beginner guitar player, so it’s a great idea to take the time to learn every single chord here.
How To Read A Chord Diagram
To fully understand the images in this guide, you’ll need to know how to read a chord diagram. A chord diagram contains vertical and horizontal lines. The six vertical lines represent the strings on the guitar. Starting with the low E (thickest) string on the left and ending with the high E (thinnest) string on the right.
The horizontal lines represent the frets of the guitar. If you can see the horizontal bar at the top of the diagram, then the shape starts on the first fret of the guitar. If there isn’t a horizontal bar and there is a number to the left of the diagram instead, then that number tells you which fret to place the chord shape.
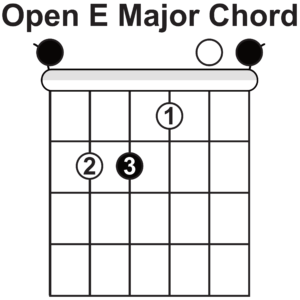
The other main element of a chord diagram is the circles. The black circles represent root notes (notes that share the same name as the chord) and the white circles represent other notes in the chord. For example, in an open E major chord, all the black circles would be E notes. The numbers inside the circles simply tell you which finger to use to fret each note. If there are any circles above the chord diagram, then you know to play those strings open. Let’s look at our first chord.
E Major Chord
The E major chord isn’t the easiest chord to get down, but the shape is used to make up many other chords you’ll play down the road so it’s a good one to start with. Place your three fingers in the positions laid out in the chord diagram below. Be sure to come directly down on the strings so your fingers don’t accidentally mute any adjacent strings. Play each string individually to double-check that they all ring out cleanly.
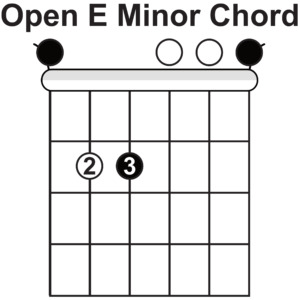
E Minor Chord
The next chord is easy! All you need to do is lift up your first finger after making the open E major chord shape. Doing this transforms your E major chord into an E minor chord.
A Major Chord
Now for an open chord that can be a little challenging. To play this shape, you’ll need to put your third, second, and third fingers very close together. This can cause them to push each other out of the way a little bit resulting in a messy, muted chord. Make sure you’re coming directly down on the strings so your fingers take up minimal space. If you continue to struggle with this one, you can try using your second, third, and fourth fingers instead.
It’s important to note that the low E string needs to be left out of this chord. Make sure not to let it ring out by muting it, or by avoiding it altogether when you strum.

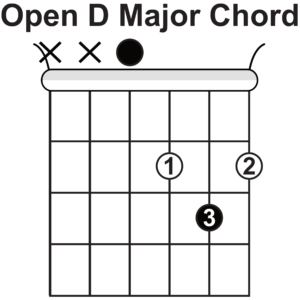
D Major Chord
The D major chord offers a unique challenge. With the open D major chord, you’ll need to avoid playing both the low E and A strings. The best way to do this is to practice hitting only your top four strings when strumming. If you have large enough hands then wrapping your thumb around the top of the guitar neck and laying it over the bottom two strings can be a great way to keep the strings muted.
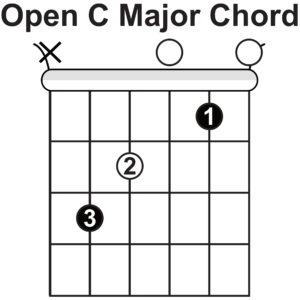
C Major Chord
For this next chord, you’ll need to exhibit a little bit of hand flexibility. You’ll be stretching your hand a pretty considerable distance especially if you’re new to playing the guitar. The key to getting this chord to sound good is to make sure your hand is positioned properly and your fingers are coming straight down on the strings.
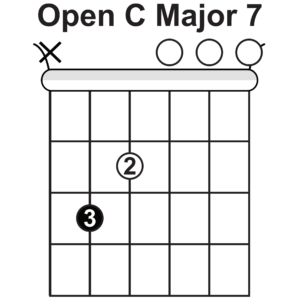
C Major 7 Chord
Let’s try a fancy chord. Simply remove your first finger from the open C major chord shape and you’re playing a C major 7 chord. Unlike the major and minor variations of a chord, 7th chords are solely there for some added flavor.
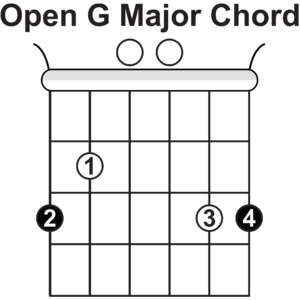
G Major Chord
There are a few different variations of the open G major chord, but this one tends to be the most popular. You’ll need to use all four fingers for this shape. Make sure you’re not accidentally muting either of the open strings that need to be played.
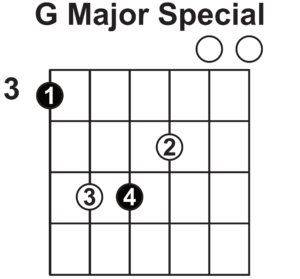
G Major Special Chord
To cap things off, Ayla shares a special version of the G major chord. This one is a little more challenging to play but has a great sound. Note the “3” on the left of the diagram that indicates this shape must be played at the third fret.
That’s it for the essential guitar chords for beginners! In the next video, Ayla is going to show us five beautiful chords you can play if you’re new to the guitar.
5 Most Beautiful Guitar Chords For Beginners
Download: Chord Chart
Before getting into these new guitar chords, download the PDF chord chart linked above.
The chords in this section of the guide aren’t chords you’ll be using as often as the first eight, but they are a great way to add some extra sauce to a chord progression.
E Minor Add 9 Chord
This first variation of E minor is easy to play and is a direct replacement for a regular E minor chord. Ayla’s preference is to use her fourth finger for this shape but you can use your third finger if it’s more comfortable for you.

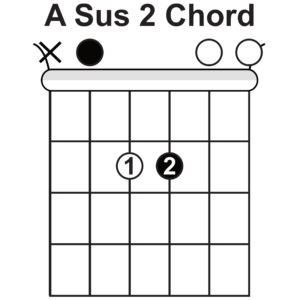
A Sus 2 Chord
Suspended chords are chords that don’t have a major or minor quality. This means an A Sus 2 chord can be substituted for either an A major or A minor chord. Keep in mind it can’t always be substituted and is dependent on the key you’re playing in.
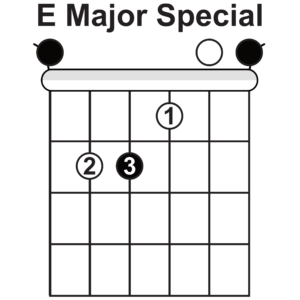
E Major Special Chord
This chord shape is identical to the regular open E major shape you already know. The only difference here is that you’re going to move the shape around. Without changing anything, try sliding the shape up and down the neck to see what kind of sounds you can get.
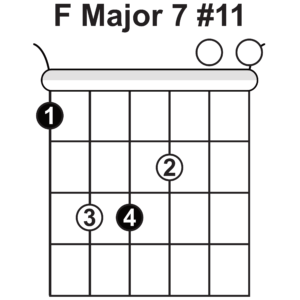
F Major 7 #11 Chord
The name of this guitar chord makes it sound way more complicated than it actually is. This version of an F major chord is a flavorful way to spice up the standard F major chord.
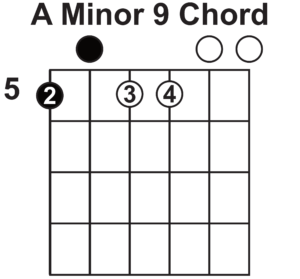
A Minor 9 Chord
The last chord in this list is a variation of an A minor chord. This one utilizes open strings and can be played with your second, third, and fourth fingers or with your first, second, and third fingers.
10 Tips For Smoother Guitar Chord Transitions
So now that you have a bunch of chords under your belt, it’s time to start combining them. Ayla is here to give ten helpful tips for improving your chord transitions. This is a massive pain point for beginner guitarists and in many cases causes them to quit playing guitar altogether.
The main way to get better at changing chords comes simply from spending more time playing. As long as you’re not building any bad habits, you’ll get faster the more often you play. But if you want a few cheat codes from a pro, the tips in this lesson will help you improve even faster!
Tip # 1 – Internalize One Chord At A Time
Before you even practice changing from one chord to another, put on the brakes and try focusing on one chord at a time. This helps you internalize the shape your hand needs to make when transitioning. Practicing this builds muscle memory for each chord shape which will help your hand snap back to the shape more quickly when changing to that chord from another chord.
Tip #2 – Be Mindful Of Your FIngers
Much like internalizing the chord shapes, it’s important to pay attention to what each of your fingers is doing. This even includes your thumb! Look at what each finger is doing and make sure it’s positioned correctly.
Tip #3 – Off & On
This exercise involves making a chord shape you’re having trouble with then removing your hand from the fretboard. Once your hand is reset, you can place the shape back on the guitar. This is almost like changing from one chord to the same chord. The more you do this, the more muscle memory you’ll develop.
Tip #4 – Check-In Every Now & Then
As you’re implementing the first tips in this lesson, you’ll want to double-check that the shapes you make are still being played correctly and sounding clear when you strum them. This is how you protect yourself against developing any bad habits.
Tip #5 – Isolate Two Chords At A Time
Most chord progressions in songs involve more than just two chords. This can overwhelm you when you’re stuck on the transition between the chords. Isolate just two chords at a time and work on just that transition.
Tip # 6 – Think Ahead Of Upcoming Chord Changes
Instead of waiting until the transition approaches, try thinking ahead about the next chord shape. Imagine the shape in your head so you’re ready to switch when it’s time.
Tip #7 – Start On The Root Note
One way to kind of “fake” a timely chord change is to hit the root note before you hit the rest of the chord. This can buy you a little time to get your fingers into place for the full chord.
Tip #8 – Anchor Points
Occasionally, there will be times when you can leave one or two fingers in place and just move your other fingers to make the next chord shape. These anchor points occur quite frequently in certain keys like G major and C major.
Tip #9 – Practice Without Looking
One of the best ways to work on changing between chords smoothly is to practice without looking at your fretting hand. You can do this by looking away, using a blindfold, or turning out the lights. The key is to build up that muscle memory without relying on your eyes to make sure your fingers are in the right place.
Tip #10 – Replace Power Chords With Bar Chords
Bar chords are their own individual challenge, but if you’re working on a song that includes them, you can play a simple two-note power chord instead. Then, as you get comfortable, you can replace the power chord shape with a bar chord. This tip is particularly helpful when you have multiple bar chords in a row.
That’s it for this beginner guitar chord guide. Now that you’ve got all these chords ready to go, it’s time to learn some songs!
Play Your First Song With The Guitarist’s Toolbox
Get a totally FREE bundle of our best step-by-step guitar lessons! You’ll learn how to put together everything covered in this guide to play your very first song. On top of that, you’ll have free unlimited access to 8 other courses (usually reserved for paid members) that cover things like making clean chords, reading music, playing guitar solos, and lead guitar technique. Just click on the link above to get your lessons!
Andrew Clarke is a guitarist, educator, and content creator from Vancouver, Canada. He's best known for his YouTube channel, where he creates easy-to-follow guitar lessons and informative guitar gear videos. Andrew also manages The Riff.
By signing up you’ll also receive our ongoing free lessons and special offers. Don’t worry, we value your privacy and you can unsubscribe at any time.