
In this guide, we will be tackling bar chords (or barre chords). As one of the biggest trouble areas for beginner and intermediate guitar players, it’s important to pay this skill some extra attention. The primary video we will be using throughout this guitar guide features Ayla Tesler-Mabe’s best tips for getting better at playing bar chords.
Before jumping into the lesson, you must know that learning to play the guitar offers a different set of challenges to every individual. Certain things might come easily to some guitar players while feeling completely impossible to others. This is normal, and no matter where you’re at with your playing, you should never feel like you can’t do something. Like any skill, playing the guitar takes patience, practice, and consistency. As long as you can nail those three things, there will be no challenge you can’t conquer.
With that said, let’s dig into the first video of our Bar Chord Survival Guide!
One of the best ways to grasp a new guitar technique or skill is to learn it through something memorable. In this case, Ayla is going to show us how to play bar chords on the guitar by learning a chord progression used in some songs you might know!
First, you’ll want to take a few minutes to learn the names of the notes on the low E string. While learning the names of all the notes on every string can take a long time, learning just one string shouldn’t be too hard. Here’s a quick diagram:
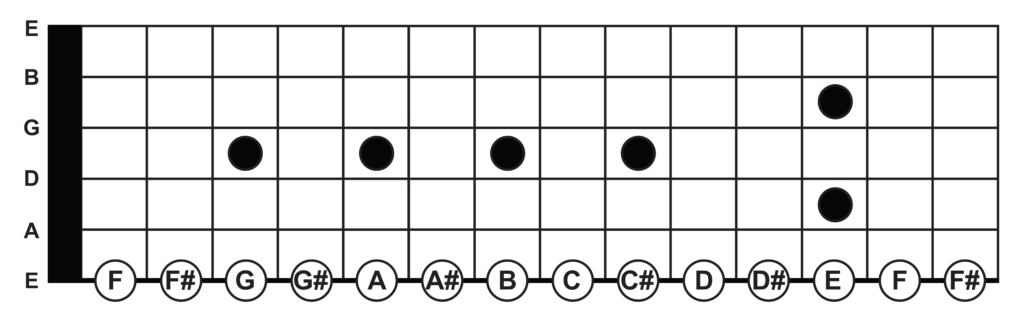
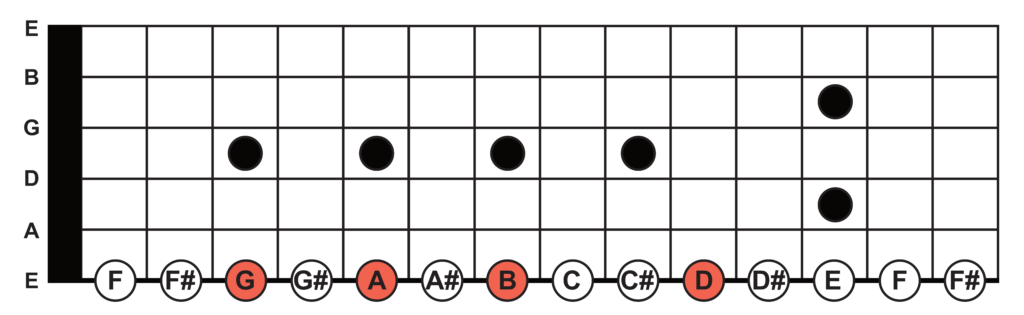
Use the fretboard markers to memorize the most important notes first. Then you can count up or down from them rather than starting all the way down with the open string. For example, if you need to find a D note, instead of starting with an open E and going up from the first fret, you can simply start at a B on the 7th fret, or a C# on the 9th fret and count up to a D (on the 10th fret) from there!
Learning your A string will be equally important down the road, but we won’t worry too much about that right now.
6-4-1-5 Chord Progression
The chord progression you’ll learn is called a 6-4-1-5 in the key of D Major. This progression is used in the song “Africa” by Toto, and also in the song “Peace Of Mind” by Boston! The chords are B minor, G major, D major, and A major.
Three of the chords in this progression can be played as open chords, but the B minor is going to require a bar chord. Since this is the case, we’ll play the entire chord progression with bar chords so you can see just how useful they can be!
Finding the Root Note
The first step to playing a chord progression like this is to find the root notes. To find the root notes, you’ll need to use your newly acquired knowledge of the notes on the low E string. A root note is the first (or most important) note of a chord and is where the chord gets the first part of its name. For example, a B minor chord’s root note would be a B.
The first chord in the progression is a B minor, and you’ll find the B note on the 7th fret of the E string. The next chord is a G major, and your G note is located on the 3rd fret. Next, you have a D major chord. For this one, you’ll go all the way up to the 10th fret to find a D note. Lastly, you have an A major which has a root note on the 5th fret.
Building the Bar Chord Shape
Making the bar is the hardest part of learning how to play bar chords on the guitar. The challenge here is generating enough pressure to push down all the strings at once with one finger. It requires a balance of strength and precision and you’ll find your hand getting a little sore when you’re first trying to make the bar.
The goal here is to be able to make a bar where every string rings out clearly. Oftentimes, you’ll find your elbow starts to move away from your body to generate more pressure. You want to avoid this. Your elbow should be pointing inwards towards your body.
One of the best pieces tips for making a better bar is using the side of your finger and not the front. This doesn’t mean you should lay your finger all the way on its side but turn it just enough so that the bony part of your finger is against the strings.
Reduce as much tension as you can from your body and place your thumb on the back of the neck. Just like anything else, getting a clean bar won’t happen immediately and might require some concerted daily practice. Be sure to go through the individual strings each time you make a bar so you know which strings ring out clearly and which ones you need to make adjustments for.
Moving the Bar
Since you already know where the root notes are of the remaining chords in the progression, you can try moving your bar to those positions as well. It won’t sound quite right yet, but right now we’re just focusing on getting a clean bar made in every position.
As you move around and make adjustments, play through the strings and listen for any notes that don’t sound right. If it all sounds good, pay attention to how that feels. If anything sounds bad, pay attention to how that feels as well.
A Minor Adjustment
Let’s turn this boring bar into a real chord! To make the chord shape, you’ll use your third and fourth fingers to fret the A and D strings. Here’s a diagram of the shape:
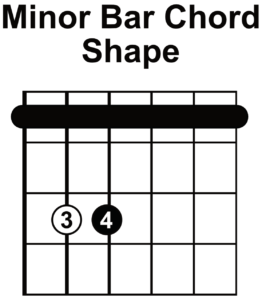
Remember all the tips from earlier in the lesson. It’s going to take some effort to make it sound clean at first. But once you get it you can move it around the fretboard to play literally any minor chord you want! As long as you know the root note, you can apply this shape and play the minor version of that chord.
If you put this on the 7th fret, you’ll have a B minor chord. On the 5th fret, an A minor chord. On the 2nd fret, an F# minor chord.
Major Chord Shape
Only one of the chords in our chord progression is a minor chord. The remaining three are major chords. To make a major bar chord we only have to make one small addition. That addition is our second finger on the G string. Here’s the shape:
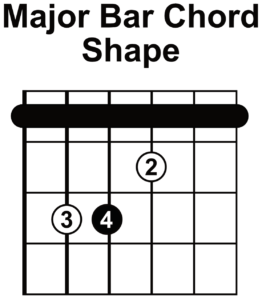
If you know anything about music theory, you’re raising the minor third of the chord up to a major third.
For a G major chord, you’ll put this shape on the 3rd fret. For a D major chord, you’ll slide all the way up to the 10th fret. For the A major chord, you’ll go down to the 5th fret. And that’s the whole progression!
Practice these chords slowly in order and don’t worry too much about playing them in time. Just focus on playing them cleanly and transitioning between them.
Other Adjustments
If you happen to encounter a string that isn’t ringing out properly, you might need to make some minor adjustments. This usually occurs if one of your fingers is a little too close to the fret. This can also happen when one finger is muting an adjacent string or you aren’t pushing hard enough. Take it slow, and make the appropriate changes to make every string come through clearly.
Another helpful tip is to think ahead to the next chord as you’re playing. The more you think ahead, the easier each transition will be. This is one of the keys to getting a chord progression to sound smooth and musical.
Finger Placement
The first big area of trouble guitarists have with bar chords is that their fingers are lying too flat on the fretboard. It’s important that you come straight down on the strings so that your fingers aren’t touching strings they aren’t supposed to. This might require you to build a little bit of strength first.
The G String
The G string can be especially annoying, especially with minor bar chords. It’s the point in the bar that has the least amount of pressure that causes the string to be muted instead of firmly fretted. Be sure to angle your finger slightly so the bony part of your finger is being used for the bar. You can even experiment with moving the barring finger vertically to find the sweet spot.
Just like going to the gym, the more time and effort you put into practicing and using bar chords, the more progress you’ll see! Just like strength training, you’re not going to see results overnight. Just be consistent and employ the tips in this video and you’ll be playing bar chords like a pro in no time!
More About Bar Chords
The Rhythm Guitar Quick-Start Series
Jump into a step-by-step rhythm guitar course by Nate Savage. Here, you’ll learn all the essential rhythm guitar techniques. These include more about bar chords, power chords, strumming patterns, chord progressions, and playing songs.
Learn seven exercises that you can add to your practice routine to improve your bar chords. These exercises range from beginner to intermediate and address all of the main trouble areas.
If you’re struggling with bar chords, this lesson is for you! Learn some handy bar chord alternatives as well as even more tips for making your bar chords sound better.
If you’re ready for even more guitar techniques, then you should sign up for the Guitarist’s Toolbox. You’ll get 9 of our members-only courses sent to your email totally FREE. Learn how to play your first guitar solo, read music, improve your chord changes, use scales, and more! Just click here to get your free courses.
Andrew Clarke is a guitarist, educator, and content creator from Vancouver, Canada. He's best known for his YouTube channel, where he creates easy-to-follow guitar lessons and informative guitar gear videos. Andrew also manages The Riff.
By signing up you’ll also receive our ongoing free lessons and special offers. Don’t worry, we value your privacy and you can unsubscribe at any time.