
If you’ve spent any amount of time around other musicians, you might have heard them speak about the importance of the major scale. The major scale is the foundation of all western music. Every guitar scale and guitar chord you’ll ever play comes from this almighty scale.
In this guide, you’ll find a collection of video lessons that will take you through the ins and outs of playing the major scale. You’ll start off by gaining a basic understanding of what the major scale is and the music theory behind it. From there, we’ll take a look at how to practice it and how you can apply it in a creative way. Once you’ve completed these lessons, you’ll have a complete grasp of the major scale on the guitar.
You’ll want to know the four beginner music theory principles before you get into learning the major scale. These concepts are the natural musical alphabet, half-steps & whole-steps, sharps & flats, and the BC & EF rule. Here’s a short video lesson in case you don’t already know them: 4 Music Theory Fundamentals.
Lesson 1: Understanding The Major Scale
To get the ball rolling, we’ll take a look at how the major scale is created. As you should already know, western music is made up of 12 notes. These notes begin at A and end at G#. Once you reach the end of the musical alphabet, you repeat again starting at A. To make a major scale from these notes, we will apply a simple pattern called the Major Scale Formula.
The Major Scale Formula
This formula uses a combination of whole-steps and half-steps to leave out 5 of the 12 notes. The remaining 7 notes are your major scale. The note you begin on gives the scale its name. For example, applying the Major Scale Formula and starting on a C note will give you a C major scale. Similarly, starting on an Ab note will give you an Ab major scale. Here’s the formula:

One of the easiest ways to memorize this pattern is to break it into two pieces: Whole Whole Half – Whole Whole Whole Half. And if you’re still having trouble, replacing each letter by the number representing the gaps turns it into a basic phone number, each section containing all 2s and ending in a 1. It looks like this: 221-2221.
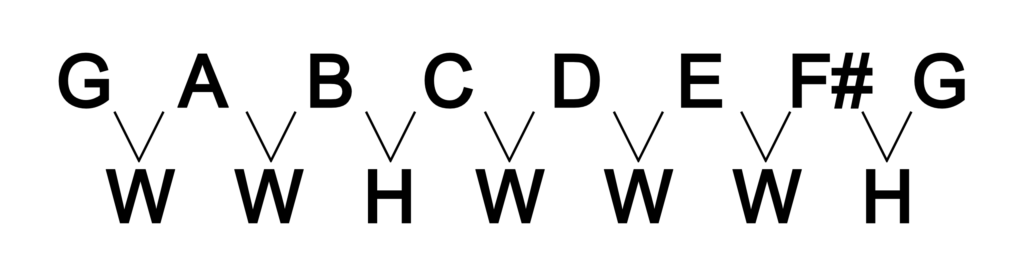
G Major Scale
Now that you know the formula, we can create some scales. Let’s begin with the G major scale. Starting on a G, we’ll go up one whole-step to an A, then another whole-step to a B, then a half-step to a C (remember, there is no B# or Cb because of the BC & EF rule), then a whole-step to a D, another whole-step to an E, yet another whole step to an F#, and finally another half-step to return to a G.
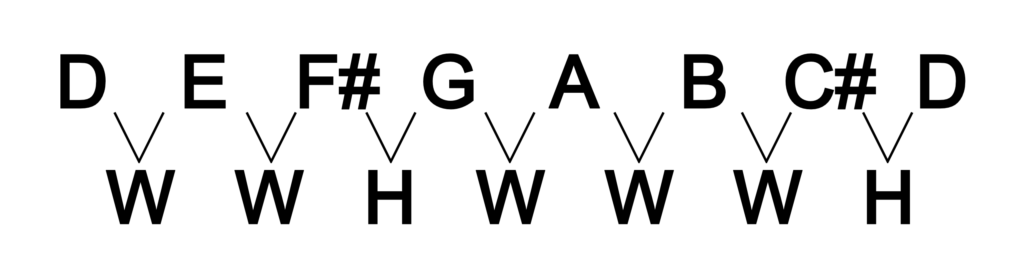
D Major Scale
Let’s try another scale. For a D major scale, we start on a D note and apply our magical Major Scale Formula. You can see this scale contains two sharp notes. Other scales you make starting on different notes will contain a different number of sharps and flats.
Practice making some other major scales using this formula. Once you feel comfortable with it, you’ll be ready to move onto the next lesson.
If you’re looking for more helpful guitar videos that will teach you how to play your first song, make clean chords, change between chords, play your first guitar solo, and much more, grab The Guitarist’s Toolbox completely FREE: https://www.guitareo.com/toolbox.
Lesson 2: How To Play The Major Scale
Before we get stuck into this lesson, it’s important that you know how to read a scale diagram. Scale diagrams will always have six vertical lines that represent the strings on the guitar. Starting from the low E string on the left and ending with the high E string on the right. The horizontal lines represent the frets on the guitar. Since a guitar has many frets, you’ll typically see a number on the far left that tells you which fret the scale shape begins at.
The G Major Scale Shape
In this lesson, we’ll learn a G major scale shape. This scale spans a little more than two full octaves and is the most commonly used major scale shape. The number 3 on the far left tells you where exactly to position your hand when playing this shape. The circled numbers are there to tell you which fingers to use and the black circles tell you which notes are G notes. These notes are called root notes and they share the same name as the scale.
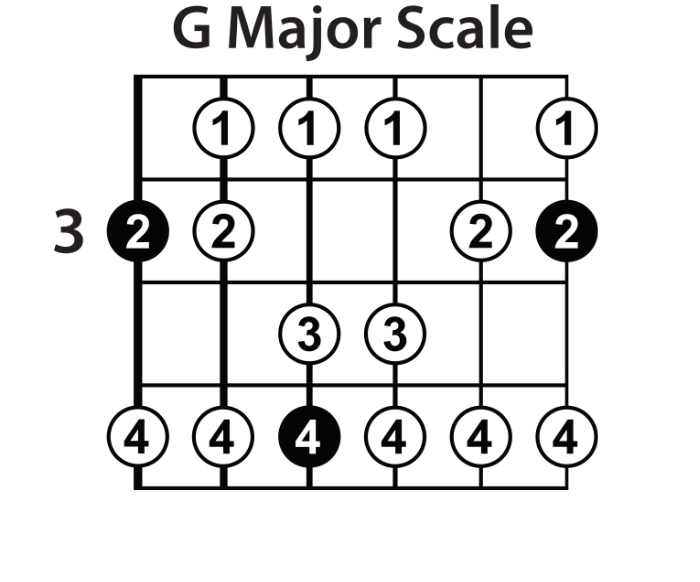
To be able to see this scale diagram as more than just lines, circles, and numbers, we’re going to take a closer look. If you remember back to the first lesson where we learned the Major Scale Formula, you’ll remember that the major scale is made up of 7 notes that repeat every time you complete an octave.
Take a look at this scale shape and you can see that the black note marks the start of each 7-note pattern. These notes would be the exact notes from the G major scale you made using the Major Scale Formula in the previous lesson.
Break It Down
When you’re learning a large scale shape like this one, it’s best to break it into pieces. You can break this shape into two smaller major scales that each start on a different black note, or you can group the strings together and just play one or two strings at a time. As you get more comfortable with each small section, you can combine them into the full shape.
As with any scale, you’ll want to be able to play this shape both forward and backward. Feel free to stop at any point during this lesson and practice before moving to the next step. Learning a guitar scale can take anywhere from a few minutes to a few weeks depending on your skill level. Don’t feel discouraged if you need to take a little extra time.
The Major Scale In Other Keys
One of the amazing things about the guitar is that the shapes don’t change when you change keys. That means if you want to play an A major scale, you won’t need to learn a whole new shape. Instead, you can simply slide the shape up or down to instantly be in a new key. To play an A major scale, you would just have to slide the shape up 2 frets and begin on the 5th fret instead of the 3rd.
Practicing The Major Scale
We have a jam track available for you to practice along to. Since the whole reason you play guitar is to play music, practicing a scale along with music is more fun and will help you to develop your musical ear.
This specific lesson was a part of our Lead Guitar Quick-Start Series where Nate Savage takes you through all the basics of playing lead guitar. For the purposes of this guide, we won’t be continuing with it since it covers many things that don’t have anything to do with the major scale.
Lesson 3: Improvising Guitar Solos With The Major Scale
One of the most incredible things about guitar scales is how they can be used to play guitar solos. A concept called improvisation is where this all starts. In this lesson, we’re going to focus on having a little more fun while playing the guitar. Instead of just running up and down a scale shape, we’re going to use our major scale to make our own original solos.
Let’s get started with the scale used throughout this lesson:
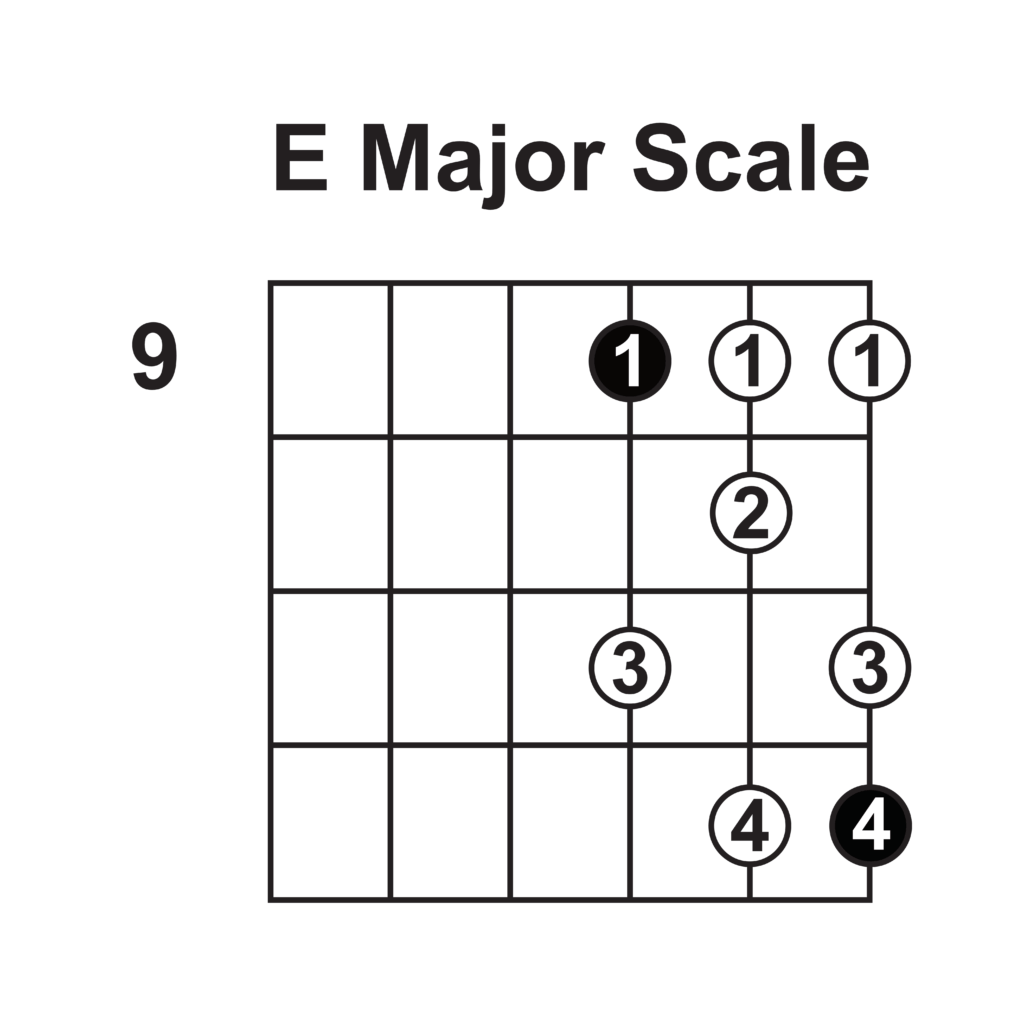
This shape might look a little bit different from the first major scale shape you used. But if you look closely, you can see it follows the same 7-note pattern before arriving again at the root note. To the left, you can see this shape begins on the 9th fret. Since our root note is on the 9th fret of the G string, that means this is an E major scale.
Take some time to really get this scale shape under your fingers. Run it forward and backward until it’s completely committed to muscle memory. Once you feel like you’re ready, you can try playing it along to the jam track here:
Follow The Chords
After you’ve played the new E major scale shape along to the jam track a few times, you’ll be ready for the first musical exercise of this lesson. This track has two different sections – each with a different chord progression. The chords used are chords from the key of E major. This means that our E major scale contains the root notes of each chord that passes.
The first section of the song starts on a C# minor chord, then goes to an A chord, then falls to an E major chord. As these chords change, you’re going to play the root note from the E major scale shape. Follow along using this diagram as reference:
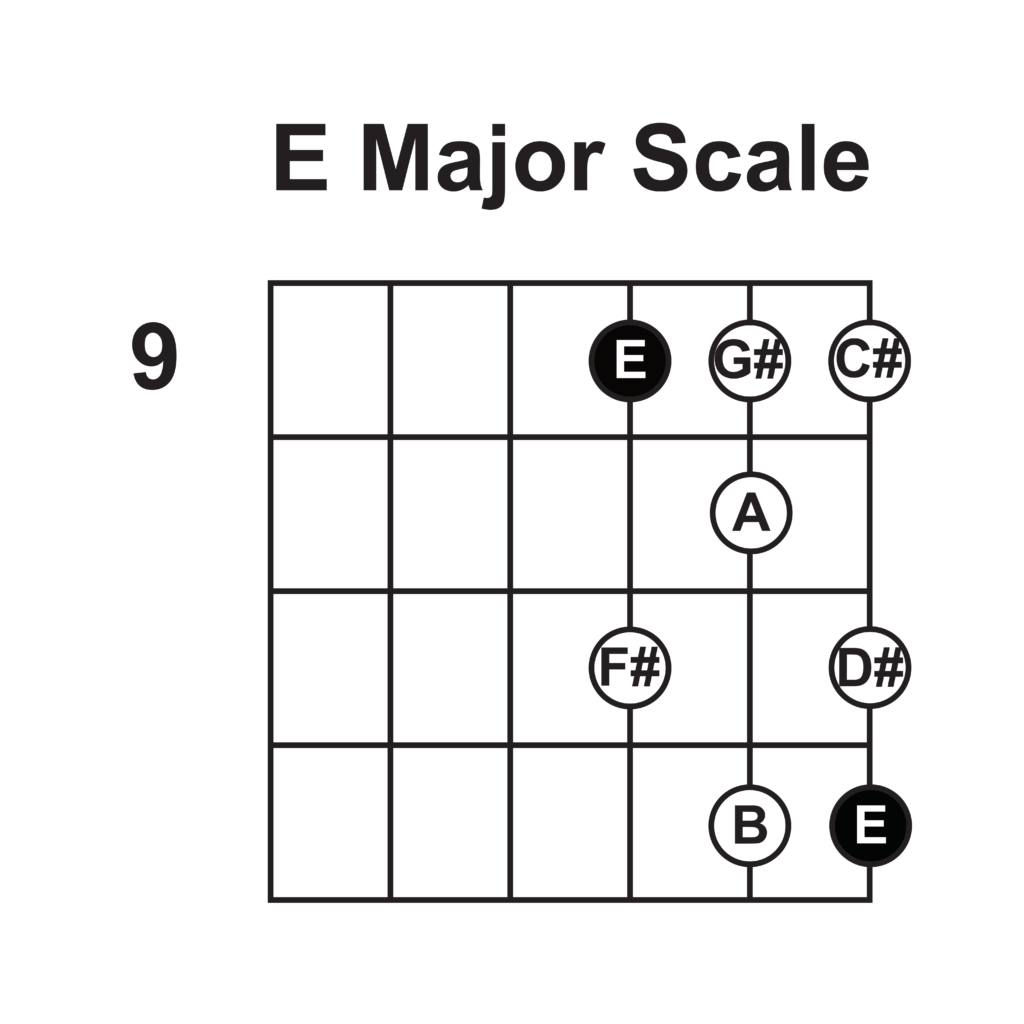
The second chord progression used in this track is B major, C# minor, A major. You can use the scale diagram above to find those root notes as well.
Adding Notes From The Major Scale
Next, you’ll add random notes from the scale shape in between each root note. This can get a little overwhelming if you’re new to playing guitar scales. If you can only play one extra note between each chord change that’s totally fine. The important thing is that you use your ear and listen to the new melodies you create with the scale.
Once you feel comfortable, you can abandon the root notes altogether and exercise total freedom within the shape. Try different combinations of notes. Repeat notes. Skip notes. And if you’re feeling crazy, you can even add a slide or a bend. It’s all about unlocking your creativity on the guitar!
What Comes Next?
Now that you’ve got a solid understanding of the major scale, you can continue to use it to make music. You can also improve your knowledge of music theory. It’s up to you which way you go, but we have a few lessons that would be great next steps once you feel ready.
What Do I Do With All These Scales?
This is an intermediate guitar lesson that takes a more expansive look at the major scale and its uses. You’ll learn a new extended major scale shape, play along to a new jam track, and get some more advanced improvisation tips to improve your lead guitar playing.
8 Steps To Understand Music Theory
You’ve only just scratched the surface when it comes to music theory on the guitar. In this beginner guitar lesson, you’ll learn the eight most important parts of music theory.
We surveyed thousands of guitar players and created a totally FREE collection of exclusive lessons solving their biggest problem. This includes making clean chords, changing chords, reading music, playing solos, and more. Grab it here: https://www.guitareo.com/toolbox.
Andrew Clarke is a guitarist, educator, and content creator from Vancouver, Canada. He's best known for his YouTube channel, where he creates easy-to-follow guitar lessons and informative guitar gear videos. Andrew also manages The Riff.
By signing up you’ll also receive our ongoing free lessons and special offers. Don’t worry, we value your privacy and you can unsubscribe at any time.